Thursday, 8 November 2012

Nivea Lip Butter


Just a little post today! We are both snowed under with uni work. I just picked up this Nivea Lip Butter in Raspberry Rose after I saw it in this months DARE (Superdrug) magazine and absolutely had to have it! 

The delicate raspberry scent is gorgeous, a delight every time you take off the lid!  I want to eat my own face when I'm wearing it. Perfect for these cold winter months when chapping is every girls worst nightmare, the formula is creamy but light and gives a subtle sheen, leaving lips feeling soft and moisturised. I am a massive fan of Nivea products and have been since forever, my mum always used them so I've grown up with the brand. 

The Lip Butters come in three different flavours, Raspberry, Caramel and Original. Can be picked up at your local drugstore or supermarket, Superdrug retailing at £1.25 and Asda at £1.99. 

Go forth & be kissable! 


Sunday, 14 October 2012

MUA Beads Trial

 My flatmate is guest-starring in this post! After prepping our nails with a base coat, we started by putting on a coat of nail polish and letting it dry for a solid base. Applying a thick coat of your chosen colour, and holding the chosen finger over a measuring jug, (for easy transfer of the beads back to pot!) we sprinkled the beads!
They stick easily, all you need to do is pat off any excess, and dip the end of your nail into the excess beads to ensure the whole nail is covered.
To put the excess beads back into the tube, ease off the lid and turn upside down, creating a funnel!
Finish off your other nails and you're all done. 
The website says to add a layer of topcoat over the beads to help them stick in place, but we tried and found this discoloured the beads! So perhaps leave the topcoat off for beaded nails. 

Super cute and relatively easy to do, these are perfect for every day wear, and you could do every nail for a special occasion. 

Friday, 12 October 2012

MUA Nail Constellation Beads (Squee!)


Just a quick post to show off todays Superdrug Shop! Two MUA Nail Constellations beads (exclusive to Superdrug), a pair of adorable pumpkin earrings (£1.99) for halloween & a black Barry.M (£2.99)


Gemini

 One of the perks of working at Superdrug is that I get first pick of what comes into store (that & the discount), & I've been waiting for these MUA Constellation beads for ages! I grabbed two to try first, Libra & Gemini. These are available in 5 colours so theres plenty of choice!


Libra

Priced at a purse friendly £2.50, they are easy to do yourself;
1) Paint your nails with your favourite shade
2) Using the funnel lid, pour the constellation beads on the wet polish
3) Gently press and allow to dry
4) Pour excess beads back into tube (will demonstrate how in a coming blogpost!)

I won't use these tonight as I'm working tomorrow too and there's still delivery to be put on the shelf, which is a total nail ruiner! But as soon as I get round to it I'll update you on how it goes! Super excited to try them out. 


Sunday, 7 October 2012

Barry.M.


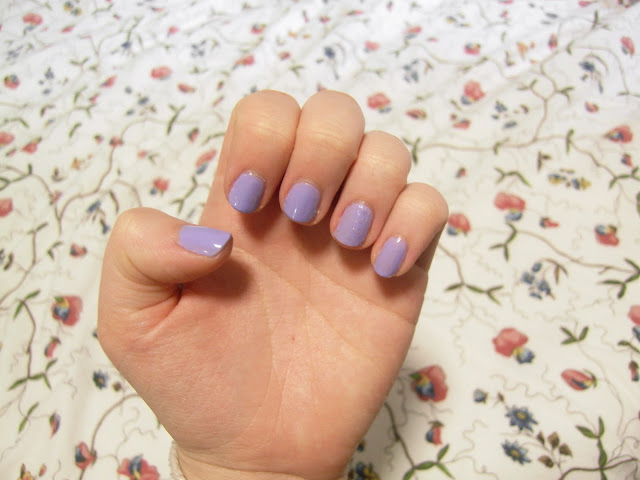
Although I am a student with a bank balance of zilch, I did a spot of shopping after work today & picked up these Barry.M nail polishes. (Gelly in Prickly Pear, £3.99, the limited edition Web Effects £3.99 & the Basecoat/Topcoat, £2.99). I got the web effects free in Superdrug as I purchased the other two.

First off I'm trying out the Prickly Pear.


I absolutely adore this shade, I've been looking for a lilacy, purple shade for a while now, & at £3.99, I figured I couldn't go wrong! The Gelly quality gives the polish a high-quality shine and although not quite making it look like I'm wearing gel nails, still a nice effect. I added a cheeky coat of pink iridescent glitter on my ring finger to keep it interesting, although this would look nice across all nails. All in all I am quite pleased with this haul!


Friday, 7 September 2012

Easy Outline Nails

This is the easy way to create outline nails, & this really makes the nails pop! When I've had mine like this I get a lot of notice with people asking how it's done. Now, you are supposed to paint the main colour & use a nail pen to outline the edges, but I find this tedious & the effect can be lost. Do be warned that this requires extra drying time due to the layers, so only attempt if you've some spare time!


If you need to get rid of polish you already have on, I really recommend the Bourjois 1 second nail remover, it's around a fiver in Superdrug and is one of the best things I've ever bought. It really gets the polish off fast and leaves a red fruit & vanilla fragrance, delish!

First, prepare & protect your nails with a quality base coat. This stops staining & stops your nails ageing 
Then paint a white base coat. I usually do two coats, but one might be enough as it is just for the edges. 

Carefully paint on your chosen middle colour, I used gray, but brighter colours looks great too! Leave to dry. Add a slick of topcoat - I used a shiny one but a matte top coat gives this look a classy edge - & you're ready to roll!


Wednesday, 5 September 2012

Syrup Pudding


This recipe is Maple Chomeur, however I'm not really the biggest fan of maple syrup so substituted this for ordinary golden syrup. This dish is so easy to make and is great for anyone with a sweat tooth. Personally, I think it's a great desert to have in the colder months - though you don't have to wait for cold weather to enjoy this pudding! 


To prepare the sauce, in a medium sized pot simmer for 3 or 4 minutes:

3/4 cup golden syrup
3/4 cup brown sugar
½ cup water
3 tbsp butter
1 tsp vanilla extract
Set aside to cool to lukewarm.


For the cake, begin by greasing a baking pan

1 1/4 cups flour
tsp baking powder
1/2 tsp salt
1/3 cup sugar

Place these dry ingredients into a large bowl and mix them together.

Then add 2/3 cup of butter into the mixture and mix, the mixture will be coarse - almost like a crumble.


To this mixture you then add 
3/4 cup milk
1tsp Vanilla extract 


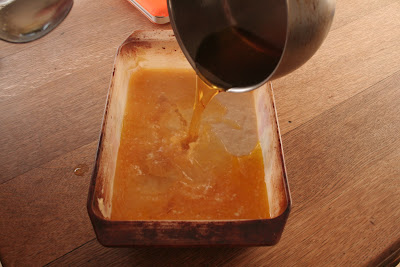
Blend them in until the mixture becomes a batter.  Then pour the mixture into the greased baking pan. Once you have done this, take the syrup mixture and pour this over the cake 
batter and bake for around 35 minutes at 350 F.


Serve in small portions if you can't handle the sweetness and add ice cream for a delicious desert!  


DIY macrame bracelet


Recently i've been spending a lot of my spare time making bracelets. Macrame, and friendship bracelets are in fashion at the moment but Id much rather make my own than buy one from a shop! - Though the ones I have seen in stores are really nice. I'll be making a DIY friendship bracelet post in the next few weeks so keep you're eyes open! 


Things you'll need: 
Chinese knotting thread - I used embroidery thread. 
Scissors 
A button 
Tape 
possibly a clip board 

To start, cut two strange of your cord in one colour - I used two. The first strand will be 2 yards long, and the second will be 30" long. Fold them both in half and set them together and tie them off in a knot with a loop at the end:


Attach it to a flat surface using tap, or you could clip it to a clipboard if you prefer. Then arrange the cords so that the two small ones are in the middle with the larger ones on either side. Tape the smaller cords down as this will make it easier to do the knotting.

The knot you'll be making is essentially a square knot which requires two ties to complete each individual knot. Start by bringing the left hand cord over the two middle cords making a 4 shape:


Then, lay your right hand cord over the tail of the 4, like this:


Now bring the right hand cord under both the two middle cords and the left hand cord:


Now, simply tighten:


To complete the knot, you use the same technique starting on the other side. So, make a backwards 4 with the right hand cord:


Place the left hand cord over the right hand cord's tail and bring the left hand cord under the two middle cords and the right hand cord.


Tighten this up, and there you have your first knot! Continue to knot in this manner until your bracelet is long enough to wrap around your wrist.


Now you need to add your closure. With a button you like, feed two strings through each hole, or sets of holes - I fed one long and one short strange through each side.


Tighten the strands up and tie a knot on the backside of the button. Trim off any extra cord and your bracelet is complete!


These bracelets are great to wear alone or with other bracelets for a layered look. There are many varieties of this bracelet and a great way to customise them is by by adding beads! Check out this great tutorial over at remarkablydomestic which shows you how to add beads to your macrame bracelet! 


Jam tarts

Apologies for the picture quality

I made these huge jam tarts yesterday! I wasn't planning on posting them, hence the lack of photos but they went down a treat so I figured I'd let you know my secrets. 

Prep Time: 20 mins
Cook Time: 15/20 mins
Yield: Approx 18 tarts /
or 4 if you use a large tart mould tray. 

Ingredients: 
  • 8oz/250g plain flour
  • Pinch of salt
  • 4oz/100g butter
  • 2-3 tbsp cold water 
  • Fruit jam of your choice, or lemon curd. 
  • A little extra butter for greasing
Preparation: 

Preheat oven to 350 F/180 C/Gas 4 
Lightly grease 12 hole tart mould with a little butter. 

Making the Pastry
  • Place the flour, butter and salt into a large bowl. 
  • Rub the butter into the flour with your fingertips until the mixture resembles fine breadcrumbs, working as quickly as possible to prevent the dough becoming warm. 
  • Add the water to the mixture, and stir until the dough binds together - add more cold water teaspoon at a time if the mixture is too dry. 
  • Wrap the dough in cling film and chill for a 15-30 mins. 
Assemble the Tarts
  • Take your chilled pastry and roll it out to a thickness of 0.5cm. Then cut out circles from the pastry just slightly bigger than the holes in the prepared tart mould. Gently press one disk into each hole. 
  • Place a heaped teaspoon of jam/lemon curd into the pastry lined tins. Be careful not to overfill!
  • Bake in the preheated oven for 15/20 mins - until golden brown. Leave them to cool completely before eating as Jam stays very hot for a long time and will burn your mouth! 

Tuesday, 4 September 2012

Lemon Meringue Cupcakes

These tasty cupcakes are easy to make & even easier to eat! Like a portion of lemon meringue pie, they are just the right size to battle the hunger between lunch & dinner.


The Cupcakes
What you're going to need;
100g caster sugar
100g butter
2 eggs
Zest & Juice of 2 lemons (I didn't have any so cheated with lemon flavouring!)
100g self raising flour
Lemon Curd (Not pictured)
Cupcake Cases


Beat 100g caster sugar & 100g butter until pale. Add 2 eggs & the zest and juice of 2 lemons (or lemon flavouring). Fold in 100g self raising flour.


Divide mixture between 12 cupcake cases. Smooth then make a little dip in the centre - I used two teaspoons for this bit. Take out a scoop of mix from the centre of a cupcake, spoon in 1tsp of lemon curd. Cover over with the mix you took out. Bake at 180°C (Gas mark 4) for 10 minutes. 

While the cakes are in the oven...
The Meringue Topping
2 egg whites
100g caster sugar


Place 2 egg whites into a clean bowl & whisk into stiff peaks. 

When the whites are at a stiff peak, fold in 100 caster sugar, 1tbsp at a time.

Keep whisking until the mixture looks glossy and thick - if it's looking a little flat give it another whisking. (Mine weren't airy enough so came out a bit flat, be warned!) 


Take the cakes out of the oven & swirl the cupcakes in the meringue topping, adding a little peak on top. Return to the oven for 10-15 minutes until cooked through, & meringue lightly browned. Leave to cool, then enjoy!